- Furniture
- Sofas & Loveseats
- Accent Chairs
- Recliners
- Massage Chairs
- Coffee Tables
- End & Side Tables
- Ottomans
- Entertainment Centers & TV Stands
- Cabinets & Chests
- Beds & Bed Frames
- Mattresses
- Nightstands
- Dressers & Chests
- Armoires & Wardrobes
- Makeup Vanities
- Jewelry Armoires
- Clothing & Closet Storage
- Bedding
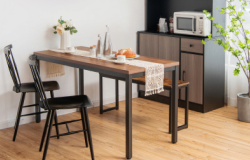
- Dining Room Sets
- Dining Tables
- Dining Chairs
- Bar Tables
- Bar Stools
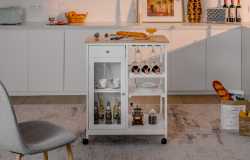
- Kitchen Islands & Carts
- Sideboards, Cabinets & Buffets

- Outdoor
- Patio Conversation Sets
- Outdoor Sectionals
- Patio Dining Sets
- Patio Dining Chairs
- Patio Tables
- Patio Bar Furniture
- Patio Rocking Chairs & Gliders
- Adirondack Chairs
- Outdoor Benches
- Porch Swings
- Hammocks
- Outdoor Chaise Lounges
- Beach & Lawn Chairs
- Outdoor Furniture Accessories
- Raised Garden Beds
- Plant Stands
- Plant Supports
- Potting Benches & Tables
- Greenhouses
- Grow Tents
- Garden Tools
- Sheds & Outdoor Storage
- Carports
- Garages
- Camping Furniture
- Tents
- Coolers
- Air Mattresses & Sleeping Bags
- Kitchen
- Appliances
- Decor
- Bath
- Baby & Kids
- Toys & Hobbies
- Sports
- Pets
- Health & Beauty
- Sales & Deals


- LIVE


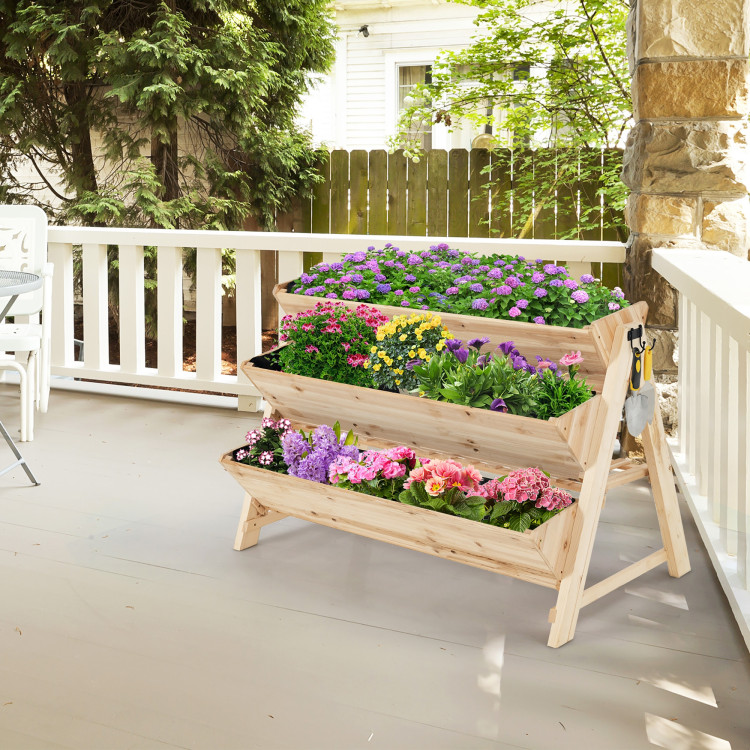
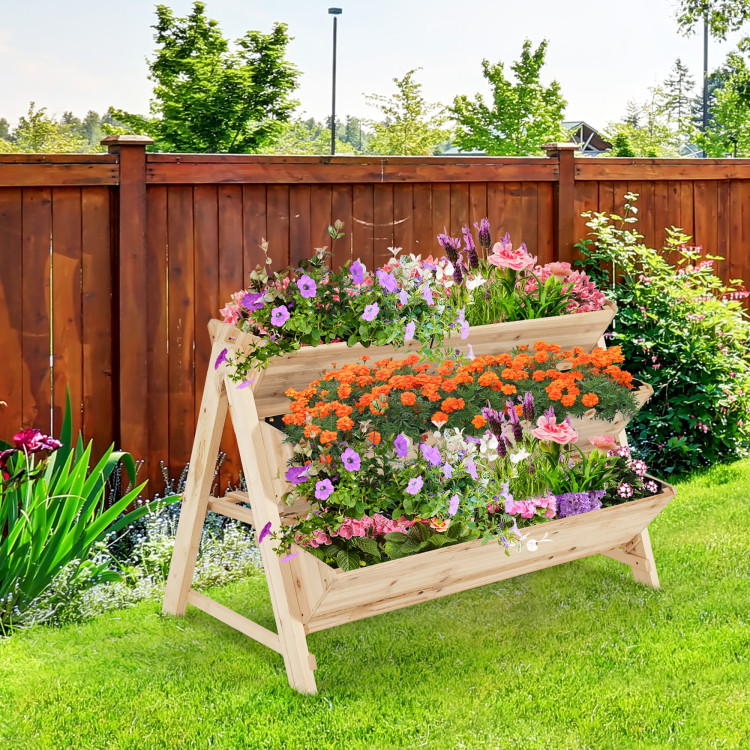

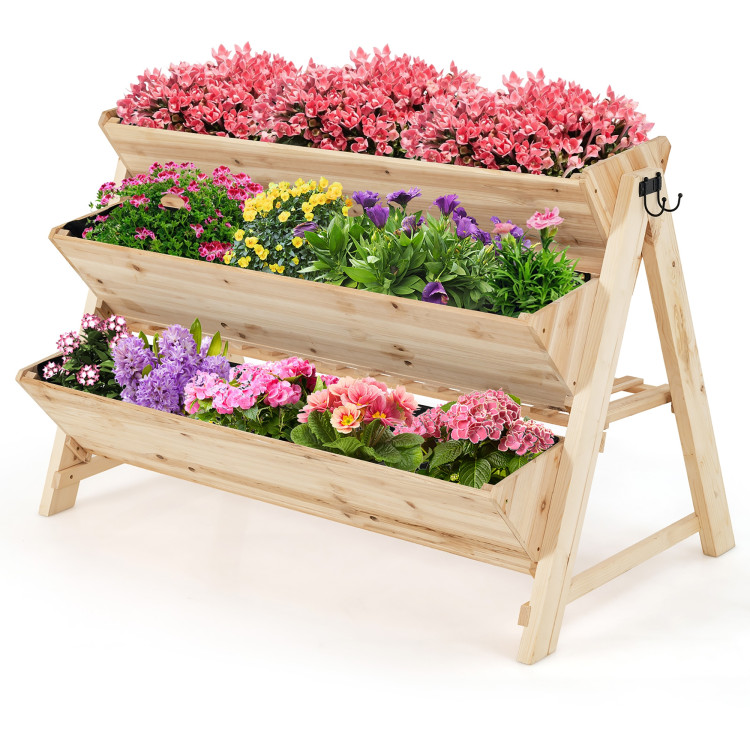
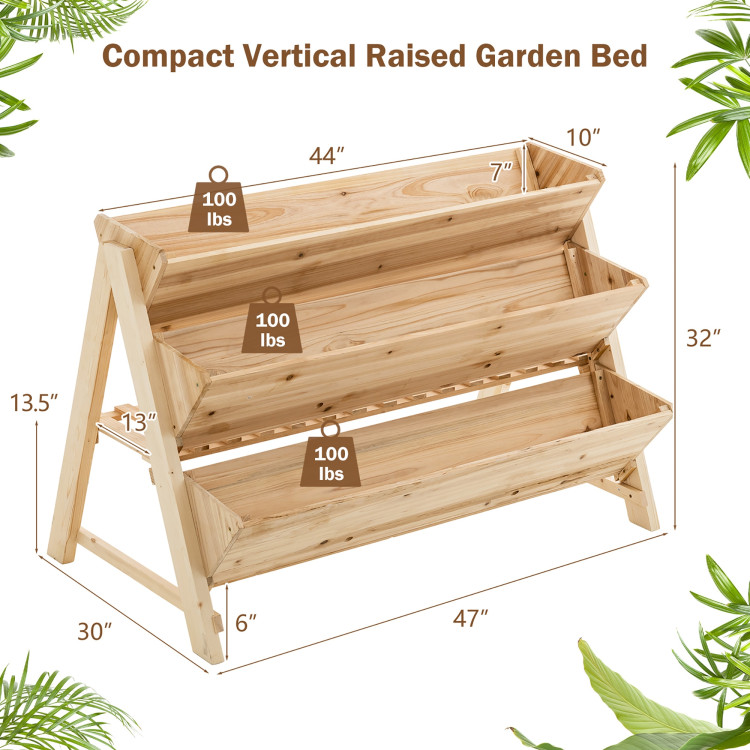


3 Tier Wooden Vertical Raised Garden Bed with Storage Shelf
5
6 ReviewsItem No: 59682037
 Log in for 99 PTS per Purchase.Log in
Free Shipping on All Orders365-Day Warranty30-day No Hassle Return
Exchange & Redeem in the shopping cart!

4pcs 18 x 18 Inches Square Throw Pillows
These 18 x 18 inches square throw pillows are perfect for adding comfort and style to your living space!
Overview
Reviews
Q&A
Manuals
Overview
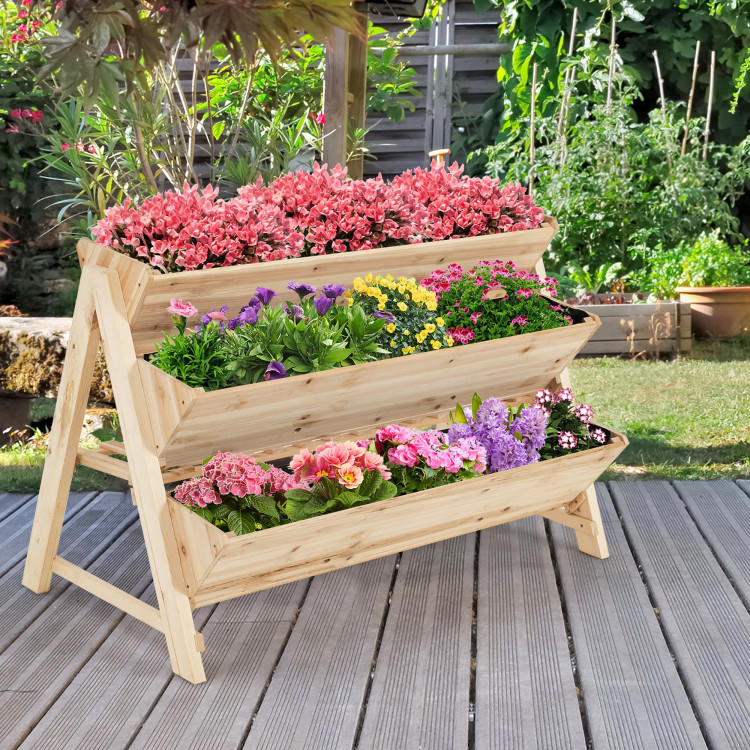
Beautiful and practical planter box in your garden!
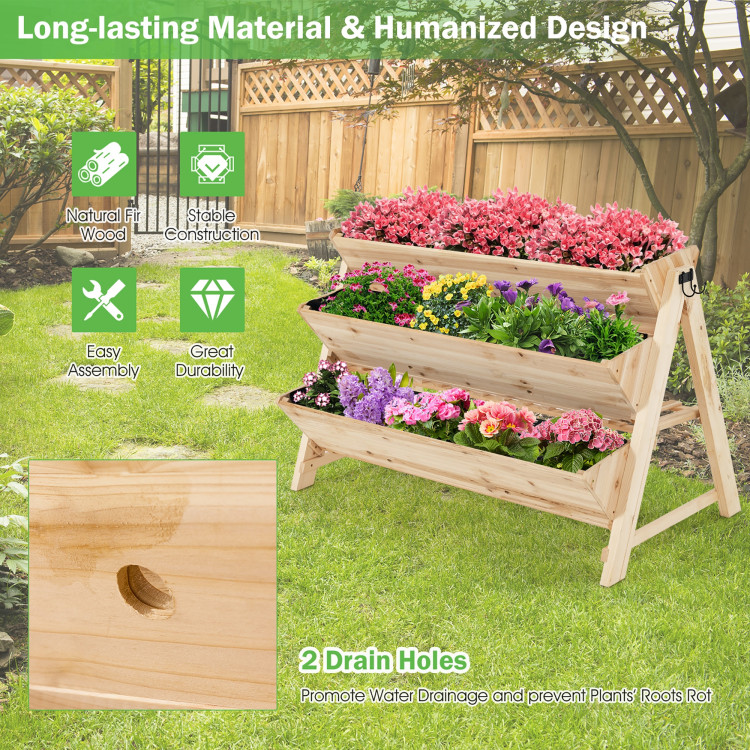
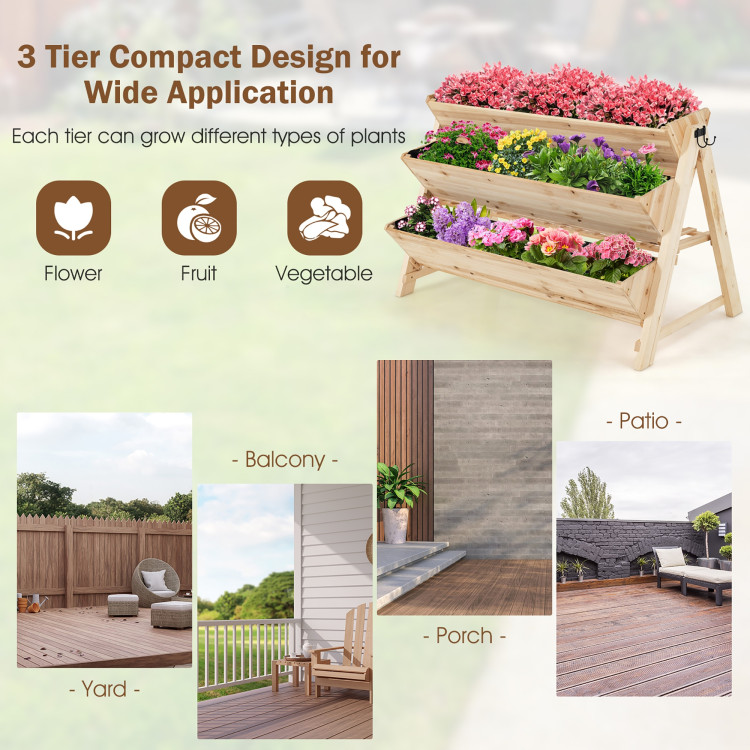
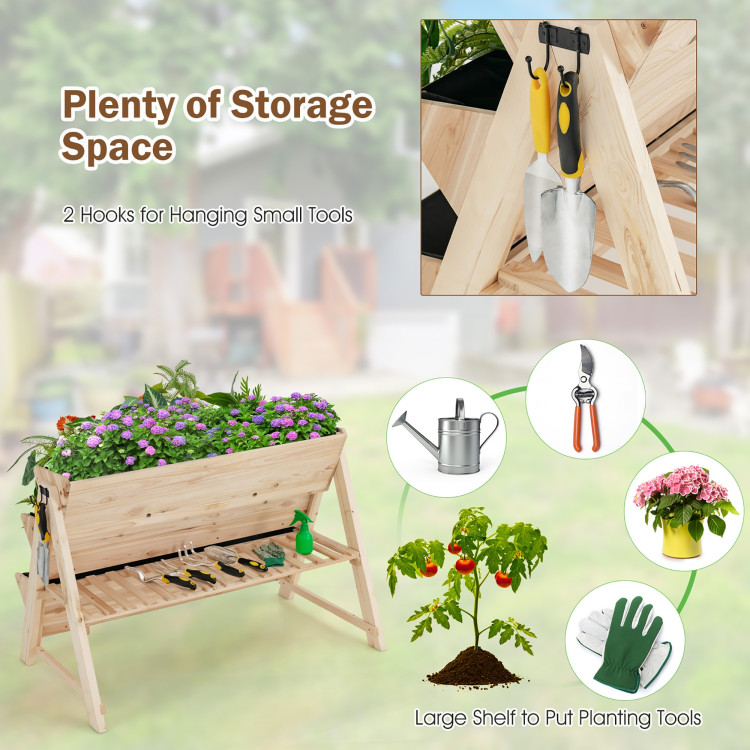
This vertical elevated garden bed has 3 tiers from top to bottom, making your garden organized without taking up too much ground space, and suitable for growing flowers, vegetables, and herbs. In addition, the planter includes a storage rack and two side hooks that provide extra storage space for your flower pot, watering pots, shovels, gloves, and other planting tools. To help your plants grow more healthily, each box is designed with two drainage holes to promote plant respiration and help drain out excess water. And each layer has a liner to prevent soil from spilling over and fouling the planter box. Our planter box is constructed of high-quality fir wood and supported by stable A-shape legs, which are durable and provide a natural appearance for outdoor use. What’s more, to reduce your confusion when assembling, we also provide vivid installation instructions and videos.
If you are looking for such a planter box, do not hesitate to take it to your home!
- 3 tier planter boxes provide ample space for different plants
- Vertical multi-layer design saves your floor space
- Large storage shelf ideal for placing watering pot and flower pot
- 2 side hooks offer extra space for small gardening tools
- Built-in liner keeps soil in place and promotes water drainage
- Multiple drainage holes are conducive to drain out excess water
- Selected fir wood is not easy to crack for long-lasting use
- Compact and elegant design suitable for garden, lawn, yard
- A-shape legs enhance overall stability to provide great support
- Clear Instruction and assembly video shorten your assemble time
Reviews
5
6 Reviews5
4
3
2
1
Frequent Mentions
- M
Beautiful planter box
The garden box was nicely packaged with Styrofoam and bubble wrap. They had several packets of silica gel in each board too, which I thought was impressive. I found the direction to be a bit vague and it took me a while to figure out step one and just where the corners of the boards were to touch. What was confusing too was the directions had board D1 marked wrong and D also marked wrong in the instructions. They showed the screws going through D1 but the holes were drilled out in board D. Step 5 was not complete either, not explaining what boards board H was suppose to attach to. As you move along in the instructions there are steps they could have added some instructions to. Like step 6 and 7. for example. You do not want to tighten the screws all the way down into your frame because you will not be able to get the next V box inserted as there is no room. So you have to make sure you do not tighten any of the screws until you are done with step 7. Also in step 7 there are 4 number 1 screws not 2 that you need to install in your top box.. You will need to predrill these as they go in very hard! Actually they do not give you the special tool for these screws either to fit the head. So needless to say I was not to happy as I had to get a tool to drive these in. One little trick you should make sure you do on this step is get a bar of soap and scrape soap all over these #1 screws on the threads, they will go in like butter then. But again make sure you predrill these holes too. Step 9 is also a little vague on the instructions. Overall everything went together great and I was happy with the outcome. One other factor I noticed is they do not tell you in the instructions where the location for the 2 big holes in each box should go. Facing forward or behind. I’m not sure its a big deal but I was wondering what these holes are for, possibly drainage. It’s a nice planter box, it's nice and big and will look beautiful this spring when the flowers get planted.
PreviewPreviewPreviewPreview - D
Easy and pretty
When I opened it I though was going to take me a lot of time to put it together but was easy and fast, using a battery drill was much easier but comes with the necessary tools anyways, also is beautiful, maybe I need to paint it or use ay product for even more durability of the wood, I’m contacting customer service to know more about it, they have and email and answered very fast
PreviewPreview - S
Happy with the Planter
Didn't take long to assemble even with 3 little kids running around while doing it. A couple of the spots to screw in were a little harder to reach, but the item itself seems like it is going to be pretty sturdy and a nice easy planter for the kids to do some gardening of their own and each have their own level.
- C
So far, price is good, so we'll see how it looks when...
So far, price is good, so we'll see how it looks when I receive it.
- H
The plants put in her getting watered daily and appear to be doing quite well.
We also used wood glue in addition to the screws provided. There are four slats that go in for the base/bottom which they provide screws for and I decided not to use. The bag fits well, just doing a good job of keeping the soil in place and helps with water retention. The plants put in her getting watered daily and appear to be doing quite well.
Q&A
No questions have been asked about this product.
Manuals
Related Products To This Item
 Added to
 Frequently Bought Together


$200